La oferta de verano finaliza el 22 de septiembre. Obtenga envío rápido gratuito con el código promocional: SHIPFREE | Compre ahora, pague después con financiamiento con 0% APR
La oferta de verano finaliza el 22 de septiembre. Obtenga envío rápido gratuito con el código: SHIPFREE | Compre ahora, pague después con financiamiento con 0% APR
Llame o envíe un mensaje de texto a un experto para obtener ayuda:360-233-2867
Conversión de cobertizo en sauna: una guía práctica completa
¿Está pensando en convertir su cobertizo en una acogedora sauna? Nuestra guía completa le guiará por cada paso del proceso, desde el aislamiento hasta las opciones de calefacción, para garantizar que cree el refugio perfecto en el patio trasero. ¿Está listo para transformar su cobertizo en un oasis personal? ¡Vamos a sumergirnos en ello!
¿Por qué convertir su cobertizo en una sauna?
Convertir un cobertizo en una sauna es una excelente manera de aprovechar el espacio no utilizado, mejorar su propiedad y crear un santuario de bienestar personal. Las saunas ofrecen numerosos beneficios para la salud, como la reducción del estrés, la mejora de la circulación y la desintoxicación. Además, tener una sauna en su patio trasero significa que puede disfrutar de estos beneficios en cualquier momento sin salir de casa.
Planificación de la conversión de su cobertizo a sauna
Evalúe su cobertizo
Antes de comenzar, evalúe el estado de su cobertizo. Asegúrese de que su estructura sea sólida, resistente a la intemperie y lo suficientemente espaciosa como para albergar un sauna. Lo ideal es que su cobertizo tenga al menos 6 pies por 6 pies para que quepa cómodamente un sauna pequeño.
Reúna los permisos necesarios
Consulte con su municipio local sobre los permisos necesarios. Algunas áreas requieren permisos para trabajos eléctricos, cambios estructurales o para agregar una sauna.
Diseña tu diseño
Esboza el diseño de tu sauna, incluyendo la disposición de los asientos, la ubicación del calentador y la ubicación de la puerta. Ten en cuenta que las saunas suelen tener dos niveles de bancos para adaptarse a las distintas preferencias de calor. Si necesitas ayuda para diseñar el diseño de tu sauna, tenemos un servicio de diseño de sauna 100 % gratuito que puedes utilizar.
Tornillos, clavos y herramientas básicas (martillo, destornillador, sierra)
Guía paso a paso para convertir un cobertizo en una sauna
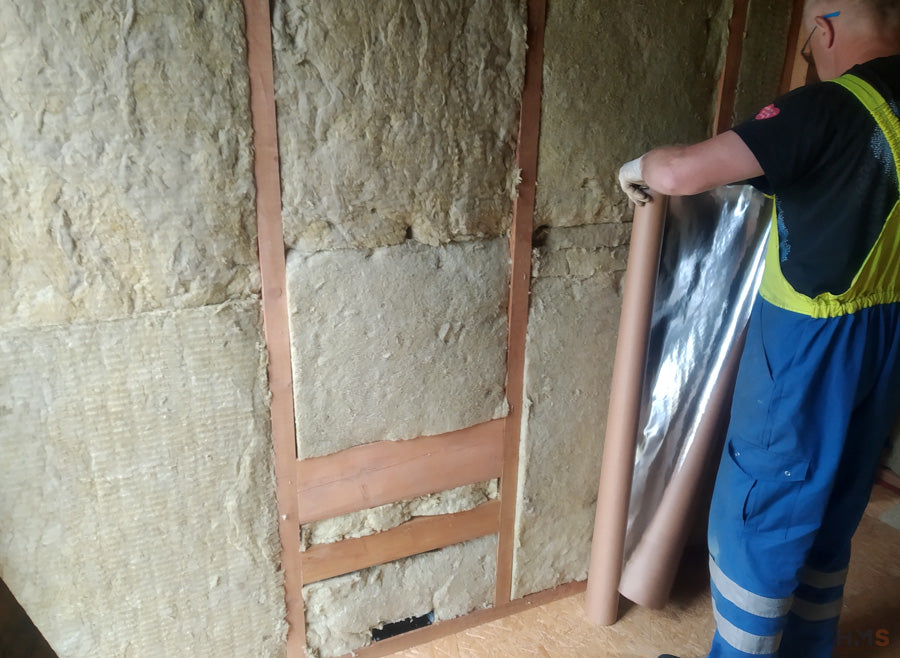
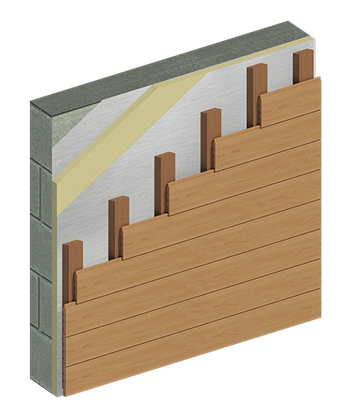
1. Aísle el cobertizo
Un aislamiento adecuado es fundamental para retener el calor. Utilice fibra de vidrio o espuma aislante para revestir las paredes, el techo y el piso. Selle el aislamiento con una barrera de vapor para evitar la acumulación de humedad, que puede dañar la estructura con el tiempo.
2. Instalar los paneles de madera interiores
Forrar el interior con paneles de madera, preferentemente de álamo termosellado, aliso, cedro o cicuta, que son resistentes a las altas temperaturas y la humedad. Estas maderas también desprenden un agradable aroma cuando se calientan. Clavar o atornillar los paneles en su lugar, asegurándose de que queden bien ajustados para evitar huecos.
3. Configure la ventilación
Una ventilación adecuada es esencial para mantener la calidad del aire y controlar la humedad. Instale un respiradero de entrada cerca del piso y un respiradero de salida cerca del techo. Esta configuración permite que circule el aire fresco y ayuda a regular los niveles de temperatura y humedad dentro de la sauna.
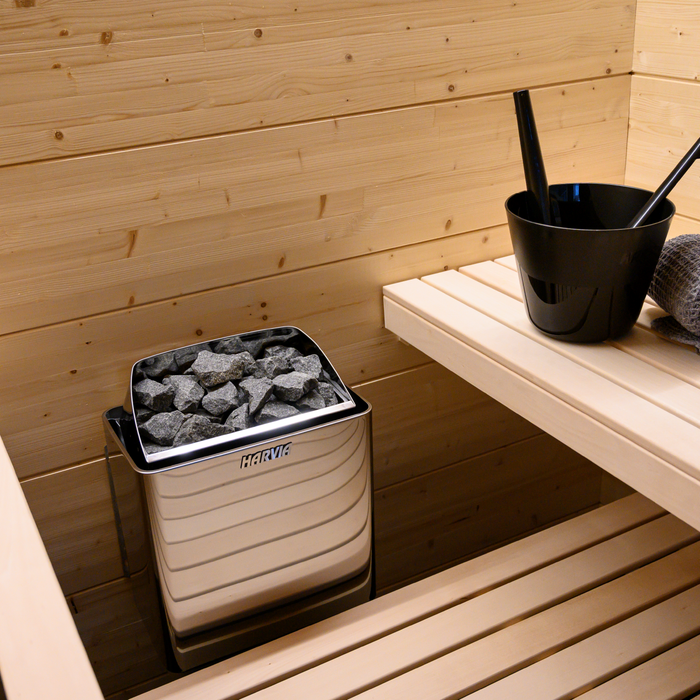
4. Elija e instale su calentador
Calentador eléctrico
Un calentador eléctrico es la opción más común para las saunas domésticas debido a su facilidad de uso e instalación. Siga las instrucciones del fabricante para conectar y montar el calentador. Coloque piedras de sauna encima para ayudar a distribuir el calor de manera uniforme.
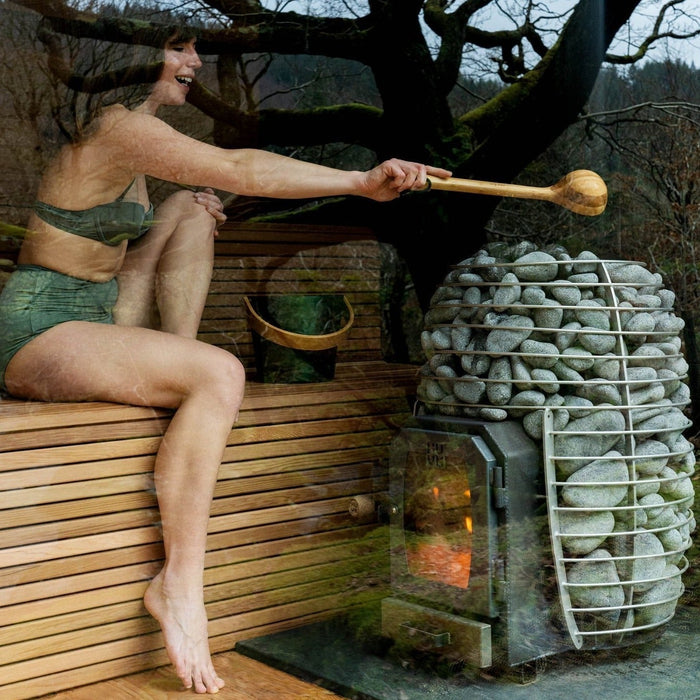
Estufa de leña
Para disfrutar de una experiencia de sauna más tradicional, considere una estufa de leña . Asegúrese de que haya una ventilación adecuada para el humo y las cenizas, y siga las normas locales para la instalación. Necesitará una chimenea para ventilar el humo al exterior.
Paneles infrarrojos
Las saunas infrarrojas utilizan calor radiante, que calienta el cuerpo directamente en lugar de calentar el aire. Instale los paneles de acuerdo con las instrucciones del fabricante, asegurándose de que estén espaciados uniformemente para proporcionar un calor uniforme.
5. Instalar la puerta de la sauna
Instale una puerta de sauna que retenga el calor y permita un fácil acceso. Las puertas de vidrio son populares porque crean una sensación de mayor amplitud, pero las puertas de madera también son efectivas. Asegúrese de que la puerta selle herméticamente para mantener los niveles de calor dentro de la sauna.
6. Añade bancos
Construya bancos con el mismo tipo de madera que los paneles. Construya dos niveles de bancos para adaptarse a las diferentes preferencias de temperatura. Asegúrese de que los bancos sean resistentes y puedan soportar peso cómodamente.
7. Iluminación y accesorios
Si lo desea, añada iluminación apta para sauna , asegurándose de que pueda soportar altas temperaturas y humedad. Instale un termómetro e higrómetro para controlar los niveles de temperatura y humedad. Otros accesorios opcionales incluyen un balde y un cucharón para verter agua sobre las piedras calientes, un reposacabezas para sauna y un toallero.
Consejos de seguridad
Ventilación: Asegúrese de que su sauna tenga una ventilación adecuada para evitar el sobrecalentamiento y mantener la calidad del aire.
Seguridad contra incendios: Si utiliza una estufa de leña, mantenga un extintor cerca y limpie periódicamente la chimenea para evitar riesgos de incendio.
Seguridad eléctrica: contrate a un electricista profesional para cualquier tarea de cableado para garantizar la seguridad y el cumplimiento de los códigos locales.
Mantenimiento regular: inspeccione y mantenga su sauna regularmente para garantizar que se mantenga en buenas condiciones y sea seguro de usar.
Disfrute de su nueva sauna
Una vez que todo esté instalado y revisado, es hora de disfrutar de su nueva sauna. Comience con sesiones más cortas para aclimatarse al calor y manténgase hidratado bebiendo abundante agua antes y después de su experiencia en la sauna.
Preguntas frecuentes
¿Cuánto cuesta convertir un cobertizo en una sauna?
El costo puede variar mucho según los materiales y el tipo de calentador que elijas. En promedio, espera gastar entre $5000 y $15 000.
¿Cuánto tiempo se tarda en convertir un cobertizo en una sauna?
El proyecto puede llevar desde un fin de semana a varias semanas, dependiendo de sus habilidades de bricolaje y la complejidad de la conversión.
¿Se puede transformar cualquier cobertizo en una sauna?
La mayoría de los cobertizos se pueden transformar, siempre que sean estructuralmente sólidos y tengan suficiente espacio. Sin embargo, los cobertizos de metal no son ideales debido a sus malas propiedades de aislamiento.
¿Necesito un profesional que me ayude con la conversión?
Si bien muchos aspectos de la conversión pueden realizarse por uno mismo, es aconsejable contratar profesionales para el trabajo eléctrico y garantizar una ventilación y un aislamiento adecuados.
¿Qué tipo de madera es mejor para la construcción de sauna?
El álamo temblón , el cedro , el aliso y la cicuta son opciones populares debido a su resistencia al calor y la humedad elevados, así como a su agradable aroma.
Reflexiones finales
Convertir un cobertizo en una sauna es un proyecto gratificante que puede mejorar su propiedad y su bienestar. Si sigue esta guía, estará en el camino correcto para crear un refugio relajante en su propio patio trasero. Disfrute de los numerosos beneficios para la salud y del lujo de tener su propia sauna personal.
*Havenly Decor y sus asociados no brindan orientación médica. Consulte a un médico autorizado para obtener asesoramiento médico. Toda la información contenida en este sitio web tiene únicamente fines informativos. Los resultados del uso de nuestros productos varían de forma individual y no se pueden proporcionar soluciones inmediatas, permanentes o garantizadas. Nos reservamos el derecho de cambiar, sin previo aviso, cualquier contenido del artículo. Havenly Decor no se hace responsable de las variaciones de impresión.


Dejar un comentario